How to Prepare Your Mix for Mastering: Essential Tips for Engineers
TL;DR: Don’t clip. Keep creative bus tone, remove safety limiters. Export WAV at native SR/24-bit, no normalizing or dithering. Keep tails. Include notes & refs.

Mastering is the final step in the music production process, where your mix is polished and optimized for distribution. What a lot of people don’t realize is that mastering can only be as good as the mix you provide. A well-prepared mix gives your mastering engineer the tools they need to elevate your track, while a poorly prepared one can hinder your engineer and lessen the final results. If you’re a mixer and just want the short version, see: For Mix Engineers. If you’re curious to dive deeper into how these two stages of music production interact, check out Mastering vs Mixing: Understanding the Key Differences.
Over the years, I’ve worked with countless producers and mix engineers, and there’s a universal truth: preparation is everything. If you want your music to sound its absolute best, taking the time to properly prepare your mix for mastering is essential. From the first microphone setup and the preamp with which you record, to the mixing engineer’s ears to mine, there are so many variables that (if kept consistent) can make the process much easier for all parties.
In this guide, I’ll walk you through a step-by-step pre-mastering checklist to ensure your mix is ready to shine. Whether you’re working with a professional mastering engineer (I know a guy) or mastering your own tracks, these tips will help set you up for success.
A Mastering Engineer’s Mix Prep Guide

Mix Prep Checklist — essential steps to prepare your mix for mastering. Check out the Resources page for more.
1. Leave Headroom in Your Mix
One of the most important steps in preparing your mix for mastering is leaving enough headroom. Headroom refers to the space between the loudest peak in your track and 0 dBFS (decibels full scale), which is the maximum level digital audio can reach before clipping (distorting). Without sufficient headroom, there’s no room for the mastering engineer to work their magic.
How Much Headroom Should You Leave?

Aim for your peaks to hit at least a few decibels below 0 dBFS. A good rule of thumb is to let the peaks sit around -3 dBFS with an average (RMS or LUFS) level between -18 and -12 dBFS. Levels like these ensure your mix retains its dynamic range and avoids distortion during mastering.
How to Check Headroom
Use a peak meter or LUFS meter at the end of your master bus to monitor levels. YouLean loudness meter is a useful free tool. If your mix is too loud, lower all faders including buses proportionally instead of just turning down the master fader — this maintains the balance of your mix.
2. Avoid Master Bus Compression (Unless It’s Intentional)
It’s tempting to slap a compressor or limiter on your master bus processing to make your mix louder or more cohesive, but this can create problems during mastering. Over-compression limits dynamic range and reduces the flexibility a mastering engineer has to enhance your track.
That said, if you’ve added subtle compression, tape noise, or saturation on the master bus as part of your creative process, and it’s integral to your sound, leave it on!
How to Avoid Over-Processing
Remove limiters (which operate at a much higher ratio than compressors) entirely from the master bus.
Use compression sparingly — no more than 1–2 dB of gain reduction if you’re applying it for glue / cohesion.
Communicate with your mastering engineer about any processing you’ve applied so they can account for it.
3. Check Your Low-End Balance
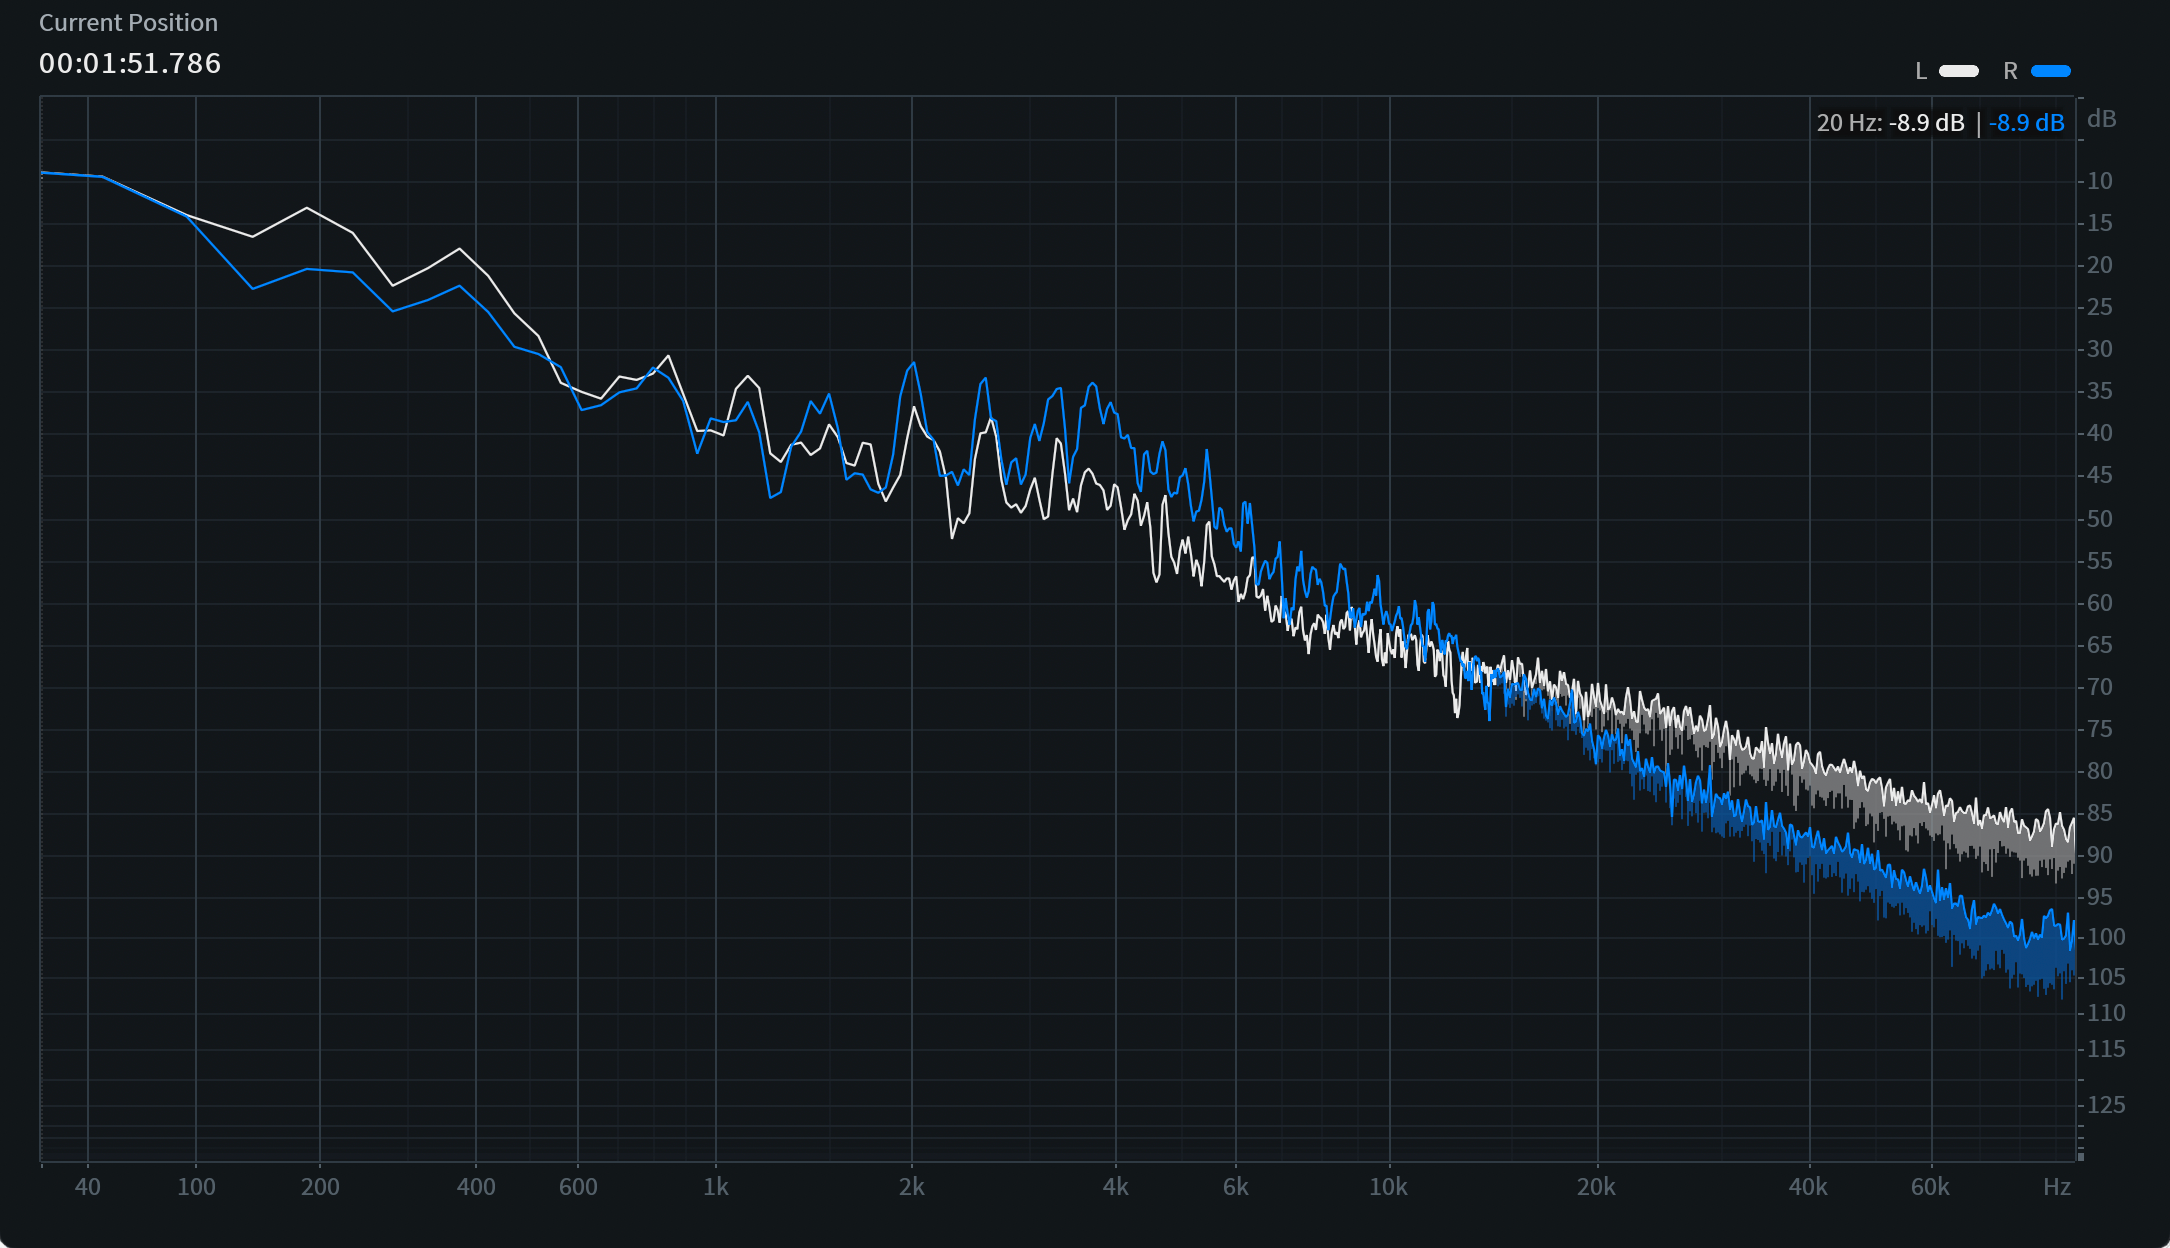
The low end is famously one of the trickiest areas in a mix and one of the most difficult to address on standard monitoring setups. Too much bass can overwhelm the track and cause issues during mastering, while too little can leave things feeling thin and flat. Ensuring a balanced low end before sending off your mix will save time and prevent unnecessary revisions.
How to Check Low-End Balance
Use a frequency analyzer to identify problem areas below 100 Hz. Look for excessive buildup or dips. I highly recommend Voxengo’s free plugin SPAN for this purpose.
Reference your mix against professional tracks in a similar genre to gauge how your low end compares. Make sure your monitoring environment is at minimum capable of reproducing sub-bass in the ~50 Hz region.
Use high-pass filters on non-bass elements (like guitars, vocals, or synths) to clean up unnecessary sub-bass frequencies / rumble.
Exact Export Settings Before You Deliver
4. Export High-Quality Files
When the time comes to export your mix, quality really matters. Sending low-resolution files like MP3s limits what a mastering engineer can do and will introduce artifacts into the final product. Always export high-quality lossless files that preserve every detail of your mix.
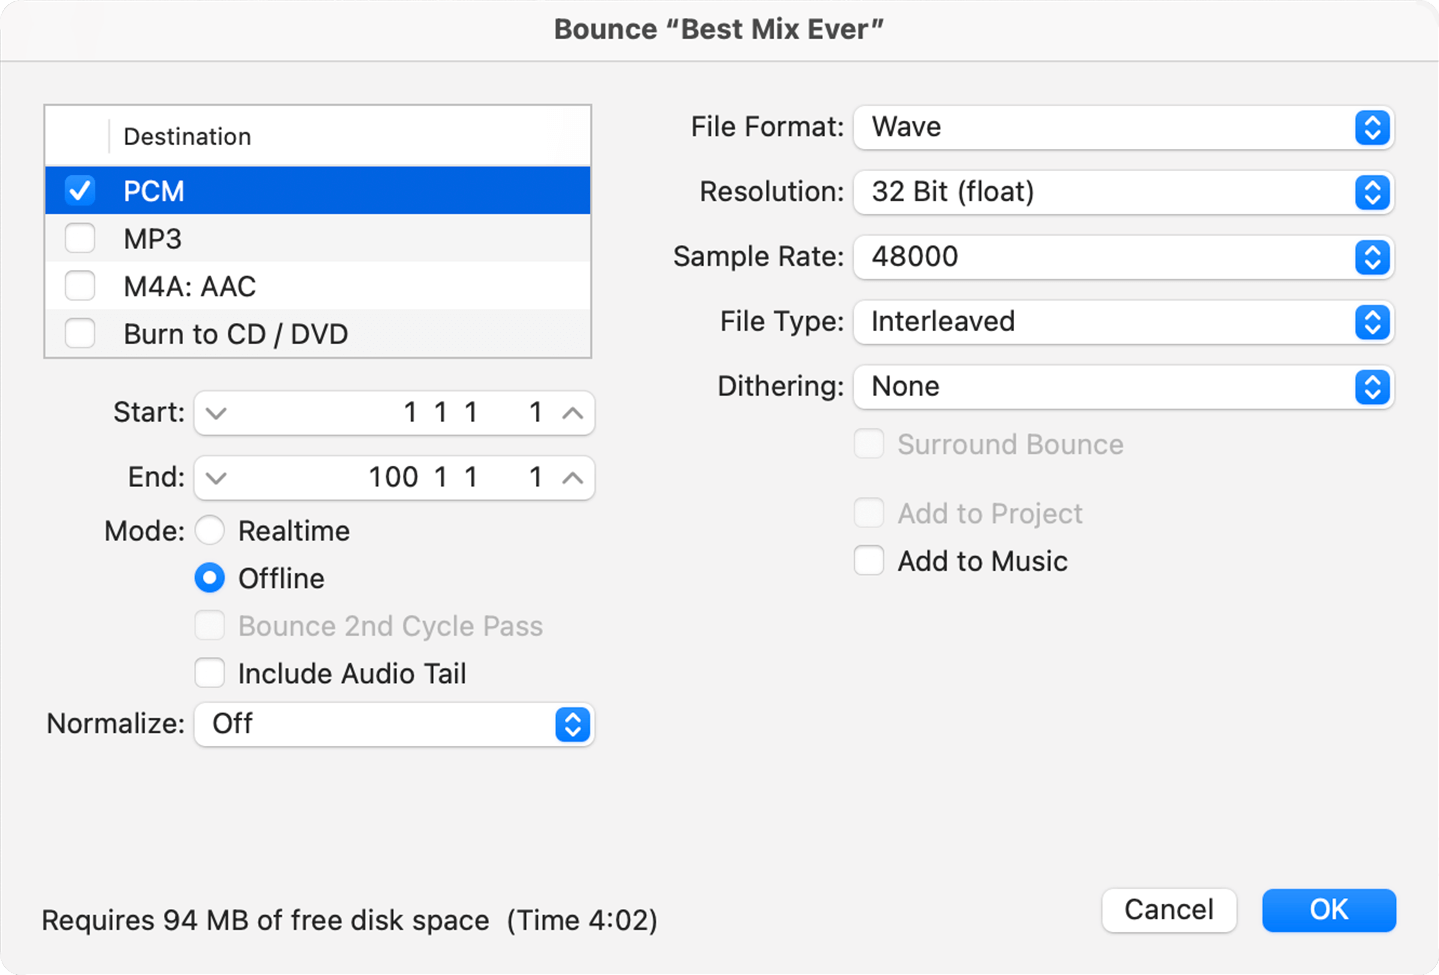
Ideal Mix Bounce Settings for Mastering — sample rate should match your DAW session.
Export Settings Checklist
File Format: Export only in WAV or AIFF, not MP3 or other compressed formats.
Sample Rate: Match the sample rate of your session (e.g., 44.1 kHz, 48 kHz, or higher). Avoid upsampling unnecessarily—it won’t improve quality. And if you would like your music upsampled for some reason I prefer to do it on my end.
Bit Depth: Export at 24-bit or (ideally) 32-bit floating point for optimal dynamic range. Avoid using 16-bit mixes.
Dithering: Do not apply dithering unless instructed by the mastering engineer. It’s typically done during mastering when converting to 16-bit for distribution.
5. Double-Check Your Mix for Issues
After exporting, take another critical listen to ensure there are no glaring issues in your mix that could carry over into mastering. Sometimes such issues are introduced by plugin latency during the bounce which is why it is generally better to bounce offline. At this stage of the process it’s good to remember that mastering isn’t about fixing problems, it’s about enhancing what’s already there.
What to Listen For:
Clicks, Pops, or Distortion: These are often caused by mouth clicks, editing errors, or clipping—its best to address them at the source and clean them up before exporting.
Harsh Frequencies: Pay attention to sibilance (harsh “S” sounds) on vocals or piercing highs from cymbals and synths. De-essing tools are much more subtle and effective when applied solely to the vocal mix.
Balance Issues: Ensure all elements are sitting well together—vocals should be clear, bass should be present but not overpowering, etc.
Fades / Space: Add fades at the beginning and end of each track if needed to avoid abrupt cutoffs. Ideally leave a bar or two of silence before and after the music and I will trim it.
Make sure the kick isn’t soloed (yes it happens!)
6. Label Your Files Clearly
It may seem minor, but proper file labeling makes life easier for everyone involved in the process, especially if you’re working with multiple tracks or revisions.
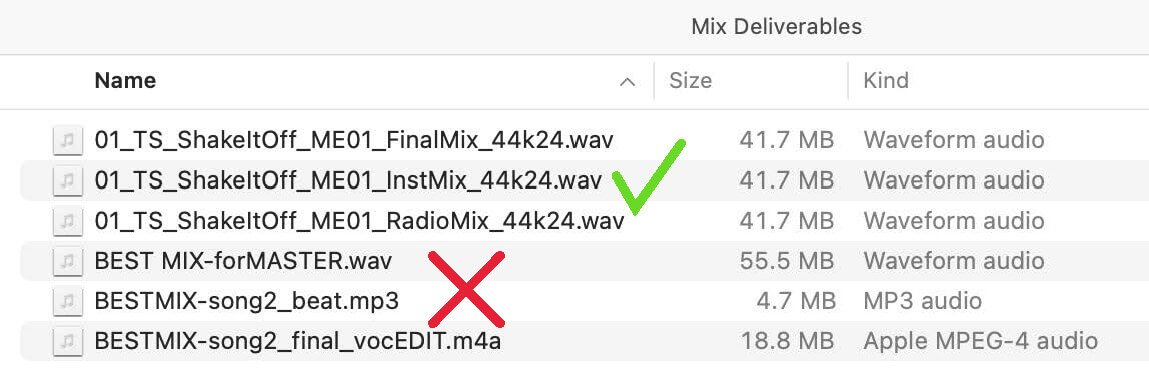
File Naming Tips:
Include the song title and version number (e.g., “SongName_Mix_v3.wav”).
Specify any important details like mix type (e.g., “SongName_RadioEdit_v3.wav”).
If sending multiple tracks for an album or EP, please label them in order of track sequence.
7. Communicate with Your Mastering Engineer
Mastering is a collaborative process, and clear communication ensures that everyone is on the same page with their expectations and goals for the project. This is true for both attended sessions and online mastering.
What to Share with Your Engineer:
A brief description of what you’re looking for in terms of tone, loudness, and vibe (e.g., “I’d like this track to feel warm and the drums to be extra punchy”).
If you already have metadata such as ISRCs, release titles, or exact credit lines, include it with the project. If not, that is normal. Most independent artists handle this during distribution.
Reference tracks that reflect the sound you’re aiming for — they’re extremely useful for aligning creative visions.
Any specific requests (e.g., “Please add 2 seconds of silence at the end”).
Final Thoughts
Preparing your mix for mastering isn’t just about technical details, it’s about respecting the creative process that led to this point, and ensuring that every ounce of effort you’ve poured into your music shines through in the final product. By following this step-by-step guide, you’ll give yourself (and your mastering engineer) the best possible starting point.
Remember: great masters start with great mixes. If you take care during this critical preparation phase, you’ll be rewarded with a finished track that sounds polished, professional, and ready to connect with listeners.
And if you ever have questions about preparing your mix, don’t hesitate to reach out — I’m here to help bring out the best in your music!