Release Day Ready: The Indie Artist’s Checklist for Sonic & Format Compliance
After mastering, the next step is making sure your release actually lands correctly with distributors and streaming platforms. This checklist covers what to do after your mixes are mastered but before you hit “distribute.” It’s your last line of defense against upload glitches, rejections, and avoidable surprises on release day. Handle file formats, metadata, loudness, and final QC now so nothing unexpected happens later.
Audio File Formats & Submission

• Use lossless stereo masters
Distributors expect high-quality WAV (or FLAC/ALAC), not MP3. For digital and CD, 16-bit/44.1 kHz WAV is the safe default every service understands. A standard 16/44.1 WAV will show ~1,411 kbps if you check properties — that’s correct.
Some platforms (including Apple Digital Masters) accept 24-bit files at higher sample rates, but they’ll downsample internally if needed.
For CDs: deliver either a proper DDP image or clean 16/44.1 WAVs with correct sequence, gaps, and ISRCs.
• Bit depth and sample rate
Keep the entire release consistent. Don’t mix 16- and 24-bit or 44.1 and 48 kHz on the same project. That can trigger unwanted conversions inside the distributor.
If you have to resample or reduce bit depth, do it deliberately in your DAW with proper dithering. Don’t rely on a distributor to “fix it” — that’s how small distortions and odd artifacts sneak through.
• File naming conventions
Name files clearly and consistently: Artist - TrackTitle.wav or 01_TrackTitle.wav.
Stick to letters, numbers, hyphens, underscores, and (if needed) spaces. Avoid emojis, symbols, and extra dots.
File-size limits vary by distributor; you don’t need enormous WAVs for a standard release, but avoid unnecessary conversions that degrade quality.
• Channel consistency
All tracks in a release should share the same channel count and sample rate. Try not to mix mono and stereo files; if you do, communicate your intent clearly.
Surround or immersive formats have their own workflows — don’t try to squeeze anything unusual into a standard stereo upload.
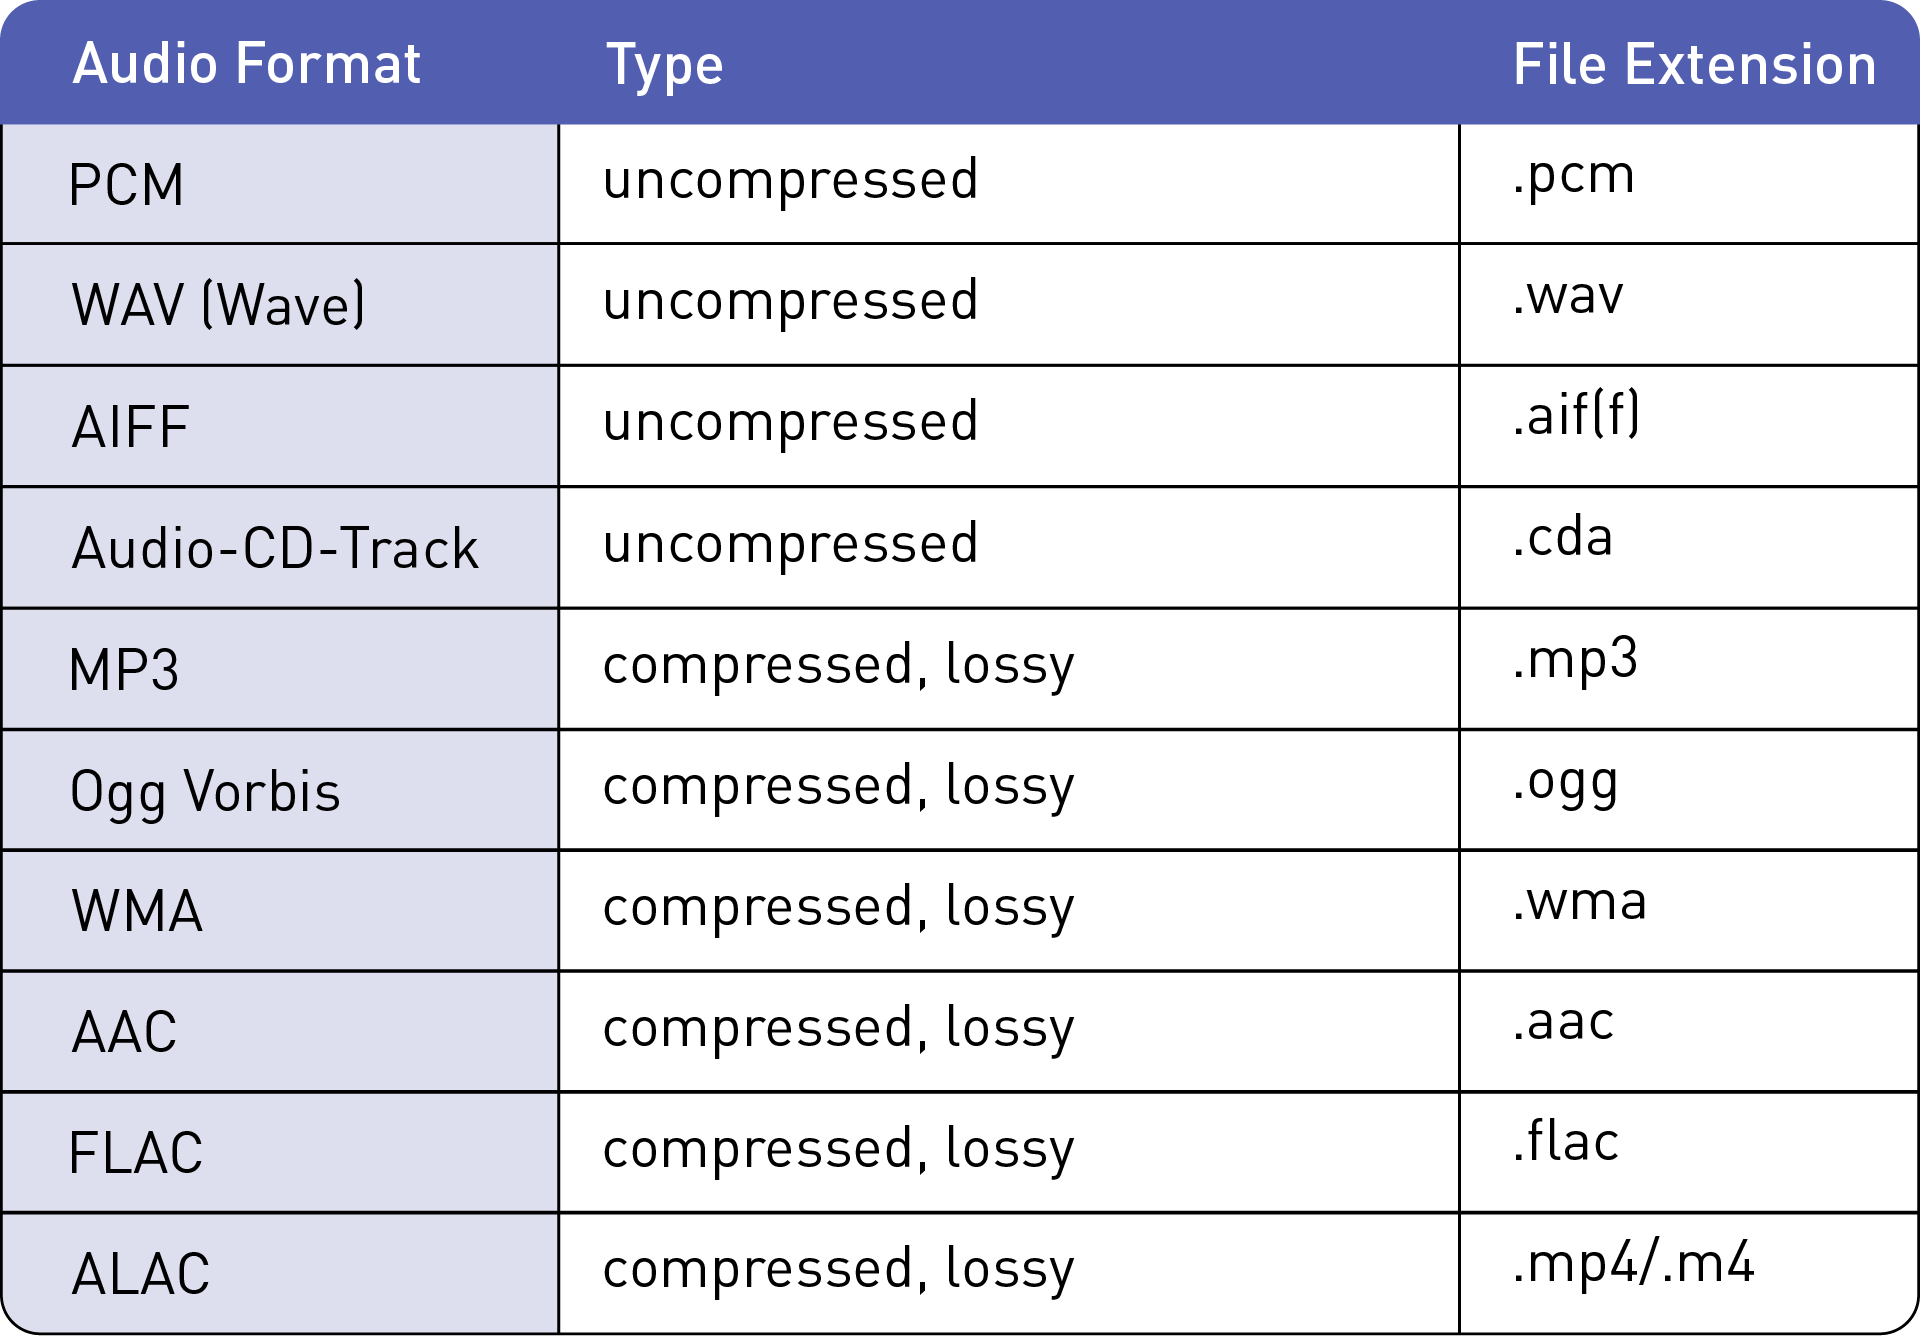
Audio Format comparison chart (from magix.com)
Metadata, ISRCs & Credits
• Distributors handle metadata
For WAV uploads, embedded tags aren’t used. You enter everything manually in the distributor dashboard. Most platforms ignore embedded metadata anyway — dashboard accuracy is what matters.
• Capitalization and punctuation
Use standard title case: main words capitalized; short connecting words lowercased unless first or last.
Avoid ALL CAPS or stylized caps unless it’s part of your artist identity and stores allow it.
• Featured artist formatting
Use the dedicated “featuring” or “additional artist” fields. Don’t wedge the feature into the track title unless guidelines call for it.
For covers, don’t list the original artist in your title — that gets flagged.
• ISRC codes
Every track needs a unique ISRC.
If you don’t already have one, your distributor can generate it automatically for digital release.
For reissues/remasters, enter your original ISRC manually to maintain continuity.
• UPC/EAN for releases
Singles, EPs, and albums each need a release-level UPC/EAN. Your distributor can provide one.
• Metadata accuracy
Triple-check spelling, punctuation, track order, version labels, and collaborators before submitting.
Credit everyone who worked on your record. For my part, if “Mastering Engineer” isn’t available, “Studio Personnel” is a good blanket credit for your engineering team.
Metadata propagates everywhere — fixing mistakes after release is slow.
Loudness & Normalization

• Know the platform targets
Most services normalize around –14 LUFS integrated; Apple sits closer to –16.
Pandora is similar; SoundCloud doesn’t normalize at all.
You’re not chasing an exact number — just predictable behavior once the track is leveled.
• Leave true-peak headroom
A true-peak ceiling of about –1.0 dBTP gives enough room to avoid inter-sample clipping after AAC/MP3 encoding.
Masters can work closer to 0 with careful control, but –1 dBTP is a safe general rule.
• Album vs track normalization
Album mode applies one normalization offset to the entire project, based on the loudest track.
One hot song can drag the whole record down.
If you care about album cohesion, think in relative loudness across tracks rather than maximizing each one individually.
• Use analyzers
Before upload, run every master through a LUFS/TP meter.
Check integrated loudness, short-term levels, peaks, and dynamic profile.
Tools like Youlean, Insight, or Loudness Penalty show expected offsets per platform so you’re not blindsided.
Pre-Submission Quality Checks
• Listen start to finish, outside your DAW
Play each final WAV in sequence on speakers, headphones, laptop — at real listening volume.
Listen for clicks, pops, double-starts, chopped fades, missing ambience.
• Check stereo balance and mono compatibility
If you leaned heavily on widening, collapse to mono and make sure nothing essential disappears.
Bass, vocal, snare, and core harmony should stay intact.
• Verify transitions and spacing
For continuous albums, transitions should be seamless.
For discrete tracks, spacing should reflect your intent.
Check reverb tails, fade lengths, and silence at ends.
• Inspect the waveform
Zoom into the very start and end of each song.
Make sure no tail is chopped, no transient is clipped, nothing touches or exceeds 0.0 dBFS.
• Re-open every export
Load each WAV in a fresh DAW or playback app to confirm version, length, mix, and master.
This catches partial bounces or wrong-version exports.
• Cross-check metadata
Compare each track title and order against your written tracklist.
Small inconsistencies lead to mismatches in stores.
Upload Guidelines

• Follow distributor specs
Most accept 44.1 or 48 kHz WAV; some support 88.2/96/192 kHz 24-bit files.
CD Baby stays conservative; AWAL, DistroKid, and TuneCore are more flexible.
Check specs on upload day — they do change.
• Match release type
Stores categorize roughly as:
• 1 track = single
• up to ~6 tracks or under ~30 min = EP
• anything longer = album
Mislabeling can trigger odd suffixes or pricing quirks.
• Artwork & packaging
3000×3000 px, square, JPEG/PNG.
No URLs, social handles, or promo text.
Ensure digital artwork matches physical packaging in sequence and spelling.
• Proofread everything
Genre, title, version, featured artists, writers, producers — check twice.
Distributors can fix errors, but it’s never quick.
Post-Release Verification

• Check each platform on release day
Listen to the full record on Spotify, Apple, Amazon, TIDAL, YouTube Music — wherever your listeners are.
Verify sequence, transitions, loudness behavior, and that nothing sounds off.
Your master should sound like your master, just normalized.
• Spot-check loudness
If possible, measure playback with a LUFS meter to confirm normalization makes sense.
A couple dB of gain reduction on loud masters is normal.
• Confirm metadata
Check your artist profile and release pages: correct artist, features, titles, versions, and no split/merged profiles.
Fix drift early.
• Align physical and digital
If you printed CDs or vinyl, confirm track order and formatting match the digital release.
UPC consistency matters.
• Register for royalties
Use your final ISRCs to register with your PRO (BMI, ASCAP, PRS, etc.) and SoundExchange.
Make sure writer splits are correct.
Common Pitfalls to Avoid
• Downsampling surprises
Ultra-high sample rates won’t necessarily improve streaming quality. Most platforms downsample by default.
Always keep a 44.1 or 48 kHz “authority” master.
• Hidden clipping after encoding
AAC/MP3 encoding can introduce true-peak overs.
This is why –1 dBTP as a general rule saves you headaches.
• Inconsistent metadata
Tiny variations in name or punctuation can create duplicate artist pages or misfiled tracks.
• Platform quirks
SoundCloud doesn’t normalize loudness, while YouTube does — though YouTube only reduces overly loud tracks, and it does so after its own encoding.
Spotify’s album vs track mode behaves differently.
Variation is normal — just be aware.
• Reusing codes incorrectly
Don’t reuse ISRCs/UPCs for new mixes or materially different versions.
Use new codes when needed.
• Premature promotion
Don’t announce a release date until your distributor has fully approved it. Edits can reset the review queue.

Closing Thought
Follow this checklist and you cut down on technical drama, metadata issues, and avoidable stress. It’s the last bit of engineering stewardship before the music leaves your hands. Done well, when listeners press play on release day, they hear exactly what you and your mastering engineer intended.